In This Article
- Why Shoot Stars With a DSLR?
- Step-by-Step: How to Set Up Your DSLR for Star Photography
- Step 1: Find a Dark Sky Location
- Step 2: Choose the Right Lens (Wide-Angle, Fast Aperture)
- Step 3: Set Your Camera to Manual Mode
- Step 4: Adjust Aperture, Shutter Speed, and ISO
- Step 5: Focus Manually on a Bright Star
- Step 6: Use the 500 Rule to Avoid Star Trails
- Step 7: Shoot in RAW Format for Better Editing
- Step 8: Take Multiple Test Shots and Adjust Settings
- Pro Tips for Better Star Photos
- Common Mistakes to Avoid
- Final Thoughts
- FAQ – DSLR Setup for Star Photography
So, you’ve got a DSLR and you’re staring up at the night sky thinking, “man, I wish I could capture that.” You’re not alone. A lot of people want to know how do I set up a DSLR to take photos of the stars, but the whole thing can seem a little tricky at first. The good news? It’s honestly not as complicated as it looks.
You don’t need to be some NASA-level expert or own the world’s fanciest gear. With the right settings, a sturdy tripod, and a little patience, your camera can pull in way more light than your eyes ever could. That’s how those crazy Milky Way shots happen.
In this guide, I’ll break down the basics—like what gear you really need, which camera settings work best, and a few tricks to make sure your star photos actually turn out.
Why Shoot Stars With a DSLR?
So, why even bother shooting stars with a DSLR when your phone can snap pics too? Well, here’s the thing—DSLRs just give you way more control. You can actually tweak stuff like shutter speed, aperture, and ISO, which makes a huge difference when you’re trying to capture faint starlight. Plus, bigger sensors = less noise in low light. Some quick reasons:
- better image quality in the dark sky
- flexibility with different lenses
- ability to shoot RAW for editing
- longer exposures without turning everything into a blurry mess
That’s why a DSLR wins for star photography.
Benefits of DSLR for Astrophotography
So, why even bother with a DSLR when you want to shoot the night sky? Simple: control. A DSLR gives you full manual settings, which means you can tweak shutter speed, aperture, and ISO exactly how you want. Phones are cool for selfies, but when you’re trying to capture the Milky Way or a sky full of stars, you need that freedom. Plus, DSLRs handle low light way better.
What Makes Star Photography Different From Regular Photography
Taking photos of stars isn’t the same as snapping pics of your dog or a sunset. For one, you’re working in almost total darkness. You’ll need longer exposures to let in enough light, and even the tiniest camera shake can ruin the shot. And unlike daytime photography, autofocus just doesn’t cut it—you’ll be focusing manually. Basically, patience and practice are part of the deal.
Essential Gear You’ll Need
When people ask, “how do I set up a DSLR to take photos of the stars?” the first thing I say is: get your gear right. You don’t need a suitcase full of gadgets, but a few basics make all the difference:
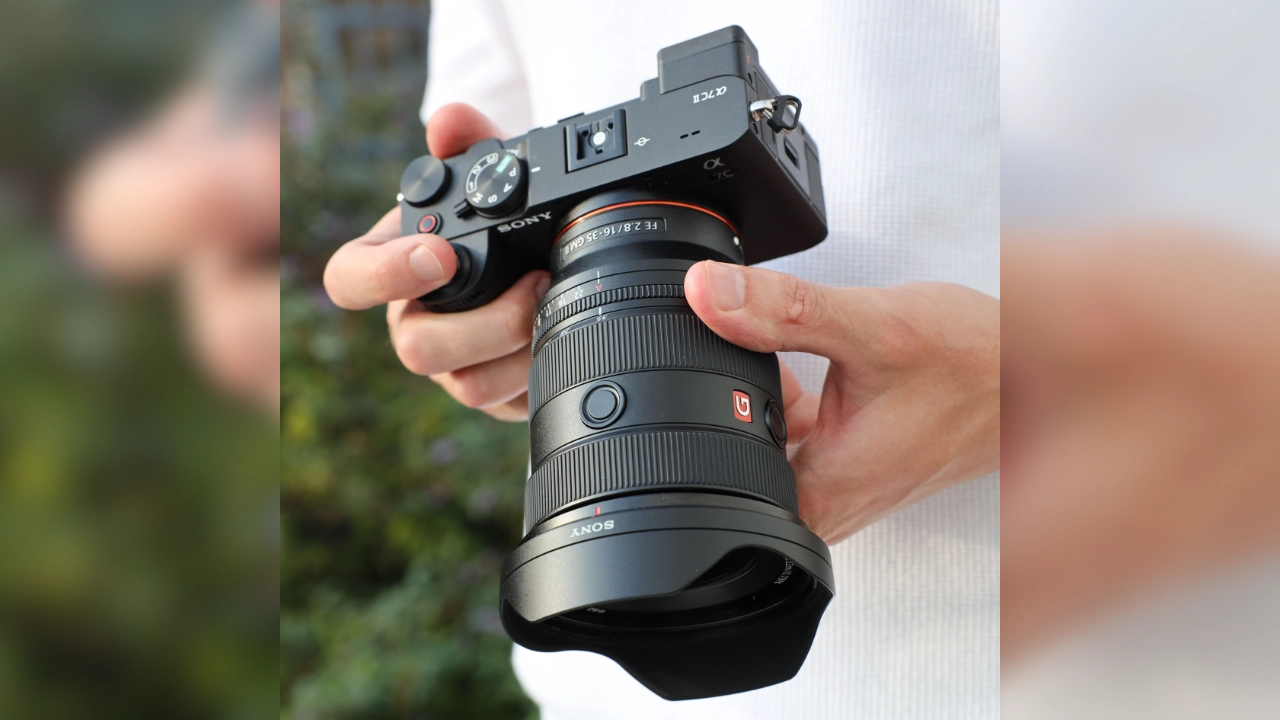
- DSLR Camera and Compatible Lens – A wide-angle lens with a fast aperture (f/2.8 or lower) is perfect for the night sky.
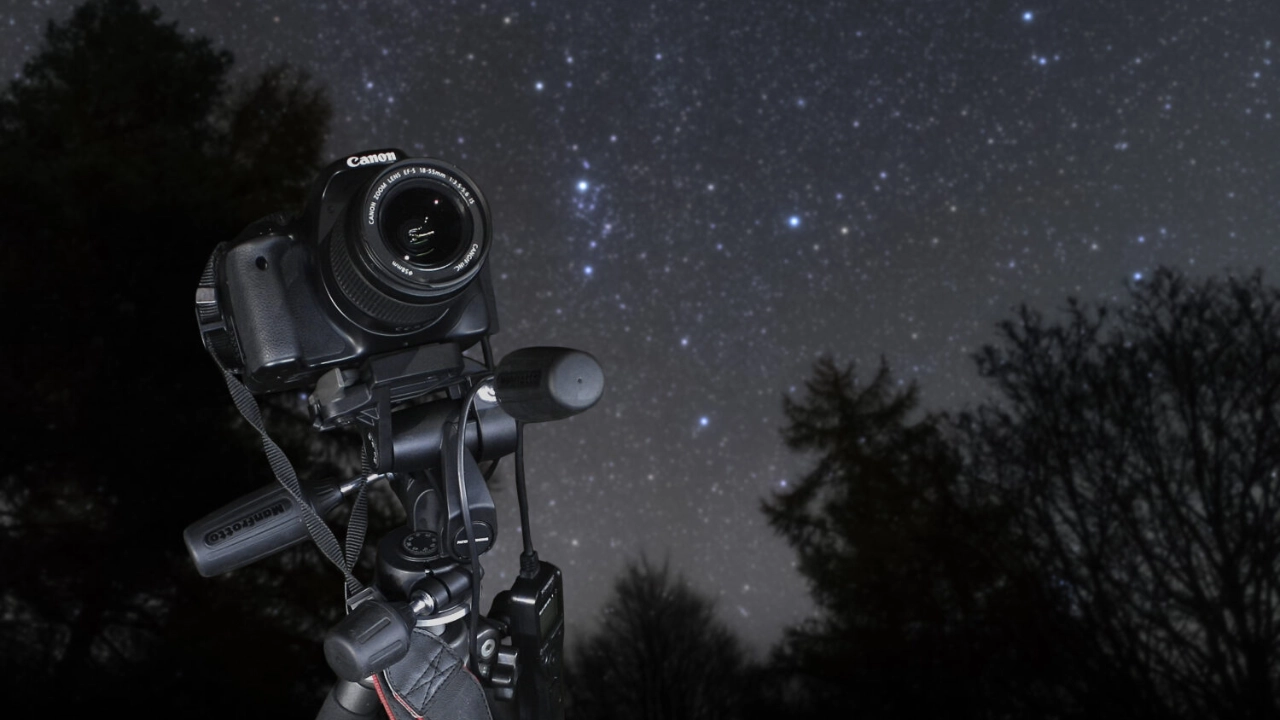
- Tripod for Stability – Long exposures = shaky hands are your worst enemy. A sturdy tripod is non-negotiable.
- Remote Shutter Release or Intervalometer – Helps you avoid touching the camera and causing blur. Plus, you can shoot multiple frames without babysitting it.
DSLR Camera and Compatible Lens
- First thing’s first: you obviously need a DSLR. Doesn’t matter if it’s entry-level or fancy—what counts is that you can shoot in full manual mode.
- Pair it with a wide-angle lens. Something like 14mm to 24mm works great because it captures more of the sky.
- Look for a lens with a “fast” aperture (f/2.8 or lower). This lets in more light, which is kinda the whole deal with star photography.
Tripod for Stability
- Without a tripod, you’re doomed. Seriously. Even the steadiest hands can’t hold a camera still for 15–30 seconds.
- A sturdy tripod means sharper stars and less frustration. Wobbly, cheap ones just make you hate life at 2 AM.
- Bonus tip: hang your backpack from the tripod hook to keep it even steadier if it’s windy.
Remote Shutter Release or Intervalometer
- Pressing the shutter button by hand will shake the camera. Not good when you’re chasing stars.
- A remote shutter (even the cheap wired ones) fixes this.
- Want to get fancy? Grab an intervalometer. It not only avoids shake but also lets you take multiple long exposures, perfect for star trails.
Key Takeaways
There is a ton of helpful information on this page, but these are the main points to remember.
- A DSLR with a wide-angle, fast lens is the best starting point for star photography.
- Always use a tripod to keep your camera steady during long exposures.
- Manual mode is a must – set aperture wide (f/2.8–f/4), ISO around 1600–3200, and shutter speed 15–25 seconds.
- Use the 500 rule to avoid unwanted star trails.
- Manual focus on a bright star or distant light works better than autofocus at night.
- Shooting in RAW format gives more flexibility when editing.
- Patience is key – expect lots of test shots before you nail the perfect one.
- Start simple, then move into advanced stuff like star trails, Milky Way shots, or using a star tracker.
- Dark-sky locations make a huge difference—light pollution is your biggest enemy.
- Enjoy the process: astrophotography is as much about the experience under the stars as the final image.
Step-by-Step: How to Set Up Your DSLR for Star Photography
So, let’s actually get into it—how do I set up a DSLR to take photos of the stars? It’s not as scary as it sounds, promise. The setup is basically about controlling light, keeping your camera steady, and knowing a few simple tricks.
First, you’ll want a dark spot away from streetlights, then switch your DSLR to manual mode. Wide lens, low f-stop, higher ISO, and a shutter speed that’s long enough to catch the stars but short enough to avoid trails. Oh, and don’t forget manual focus—it’s your best friend for star photography.
Step 1: Find a Dark Sky Location
Alright, first things first—if you want to get those gorgeous star photos, you need darkness. I mean real darkness. Cities are great for coffee and nightlife, but not for shooting stars. Streetlights, neon signs, and even a full moon can wash out the Milky Way faster than you can say “long exposure.”
So, how do you find a dark sky spot? There are a few tricks:
- Use dark sky maps – Websites and apps like Dark Sky Finder or Clear Outside can show you areas with minimal light pollution.
- Go rural or remote – The farther from city lights, the better. Mountains, lakes, or national parks usually work wonders.
- Check the moon phase – New moon nights are ideal. Full moons are bright enough to ruin most star shots.
- Scout your spot during the day – You don’t want to arrive at night and realize it’s a swamp or private property.
Once you’ve got a dark sky location, you’ll notice the stars suddenly pop. It’s magical, and it makes all the prep for shooting stars with your DSLR worth it.
Step 2: Choose the Right Lens (Wide-Angle, Fast Aperture)
Next up: your lens. Not every lens will do your star shots justice. To really capture the night sky, you’ll want something wide and fast.
- Wide-angle lens – Think 14mm to 24mm on full-frame or 10mm to 18mm on crop sensors. Wide lenses capture more of the sky and help you include landscapes or foreground objects, which makes your photos more interesting.
- Fast aperture – You need an f/2.8 lens or faster if possible. This lets in more light, which is crucial when shooting stars. The less light your lens can gather, the more you’ll have to crank your ISO, which can get noisy.
- Avoid zoom lenses for deep-sky shots – Sure, you can get creative with a telephoto lens, but for beginners, wide lenses are way easier to work with. They let you capture sweeping skies without worrying too much about tiny movements ruining the shot.
Basically, if you’re wondering “how do I set up a DSLR to take photos of the stars,” pick a wide, fast lens and you’ll already be halfway there.
Step 3: Set Your Camera to Manual Mode
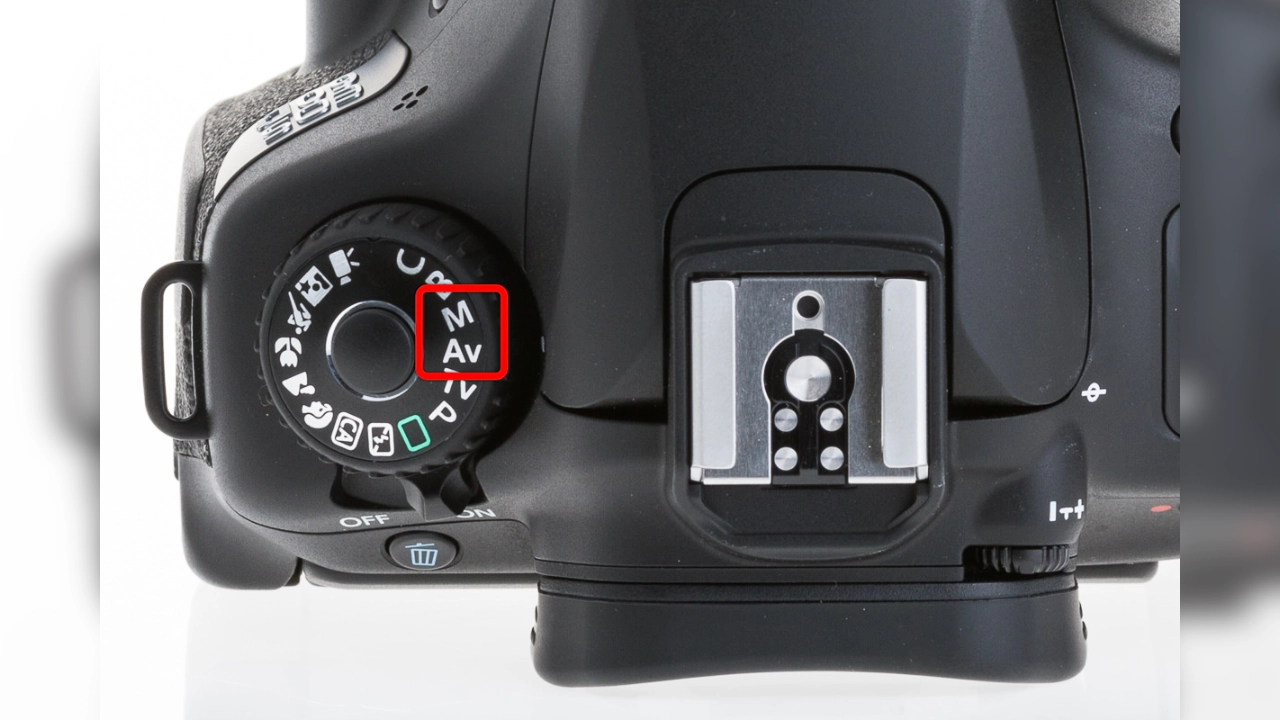
Here’s the part that scares some people—manual mode. But trust me, if you want control over your star photos, you need it. Auto modes just won’t cut it. Your DSLR will try to underexpose everything because the scene is so dark.
- Switch to Manual (M) mode – This lets you control shutter speed, aperture, and ISO independently.
- Use manual focus – Autofocus usually fails at night. Pick a bright star or distant light and focus on that.
- Shoot in RAW – RAW files give you way more flexibility in post-processing. You can adjust exposure, white balance, and recover shadows without ruining image quality.
- Turn off auto settings – Things like auto ISO, auto white balance, and vibration reduction should be off when using a tripod.
Once your DSLR is in manual mode, you start to feel like you’re actually “painting with light.” It’s kind of empowering, actually.
Step 4: Adjust Aperture, Shutter Speed, and ISO
Okay, now the fun part—dialing in your settings. This is where most beginners get confused, but it’s really not as scary as it sounds.
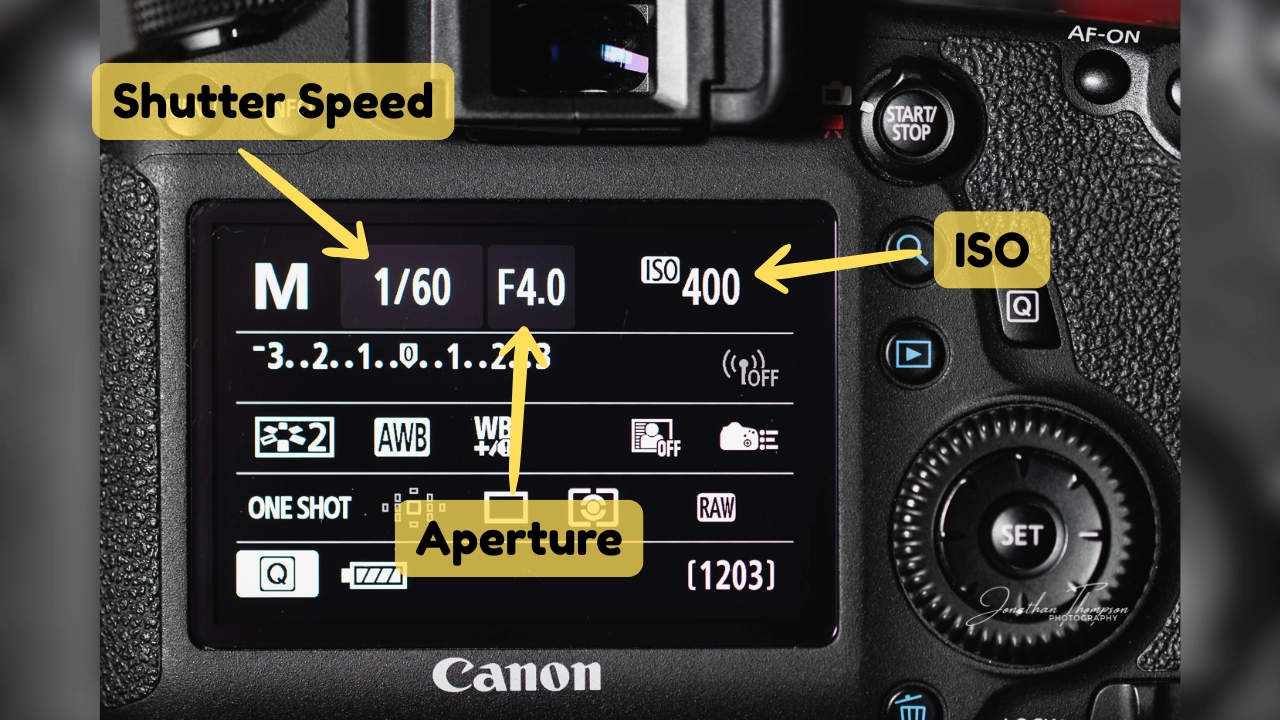
- Aperture – Set it as wide as your lens allows (f/2.8 or faster). The wider the aperture, the more light hits your sensor, which is critical for capturing faint stars.
- Shutter speed – Here’s a quick rule: the 500 rule. Take 500 and divide it by your lens’s focal length. For example, with a 20mm lens: 500 ÷ 20 = 25 seconds. That means you can expose for up to 25 seconds before stars start trailing. If your camera is crop-sensor, multiply the focal length by the crop factor first.
- ISO – Start around 1600–3200. Higher ISO makes the sensor more sensitive to light, but it also adds noise. You’ll have to find the balance for your camera. Some newer DSLRs handle ISO 6400 or 12800 surprisingly well.
Tips while adjusting:
- Take a test shot, then zoom in on the LCD to check focus and star brightness.
- Adjust ISO or shutter speed if stars look dim or trails are too long.
- Patience is key. You’ll often tweak these settings multiple times before getting a shot you actually like.
By the time you’ve done this, you’ll probably know exactly how to set up a DSLR to take photos of the stars. It’s about trial and error, experimenting with light, and learning how your camera responds to the night sky. Once you get it right, it’s insanely rewarding—nothing like seeing your own Milky Way captured in all its glory.
Step 5: Focus Manually on a Bright Star
Focusing your DSLR on stars can feel tricky at first. Auto-focus rarely works in low light, so you’ll want to go manual. Here’s the easiest way:
- Switch your lens to manual focus mode.
- Use live view and zoom in on a bright star or distant light.
- Slowly turn the focus ring until the star becomes a crisp dot.
Take your time here. Even a tiny misfocus can ruin a shot, especially if you’re aiming for sharp Milky Way images.
Pro tip: For wide-angle shots, consider using hyperfocal distance. It might sound complicated, but basically, it helps you keep both foreground and stars in focus. Once you get it dialed in, lock the focus and don’t touch it—cold nights can make lenses drift slightly.
Step 6: Use the 500 Rule to Avoid Star Trails
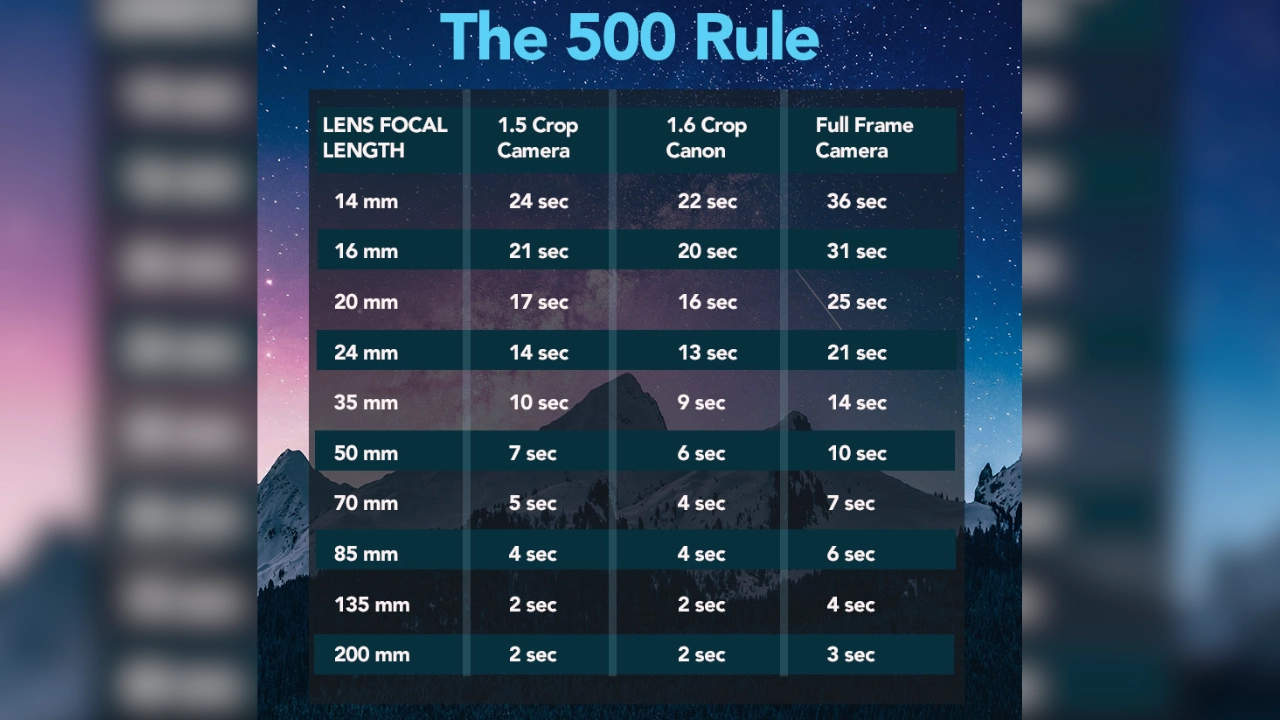
If you don’t want streaky stars, the 500 Rule is your best friend. It’s super simple:
500 ÷ focal length = maximum shutter speed in seconds
For example, a 24mm lens: 500 ÷ 24 ≈ 20 seconds. That means any longer exposure and your stars start trailing.
Other tips:
- Ultra-wide lenses might allow a few extra seconds.
- If you have a star tracker, forget the 500 Rule—it follows the stars for you.
- Always double-check your first shots for tiny trails.
Using the 500 Rule is one of the first steps to really mastering how do I set up a DSLR to take photos of the stars. A small calculation, but it saves tons of blurry photos.
Step 7: Shoot in RAW Format for Better Editing
JPEGs are convenient, sure, but for night sky shots, RAW is the way to go. Why?
- RAW keeps all the data your DSLR captured.
- It gives you way more flexibility with exposure, contrast, and color balance.
- You can rescue slightly under- or overexposed shots without losing quality.
Think about it: your first star photos might be too dark, or the Milky Way doesn’t stand out. With RAW, you can fix all that in post. You’ll need software like Lightroom, Capture One, or Photoshop, but it’s worth it.
Remember: RAW files are bigger, so pack extra memory cards. Shooting in RAW is one of the small but crucial steps in how do I set up a DSLR to take photos of the stars—it makes the difference between a “meh” picture and something you’d actually hang on your wall.
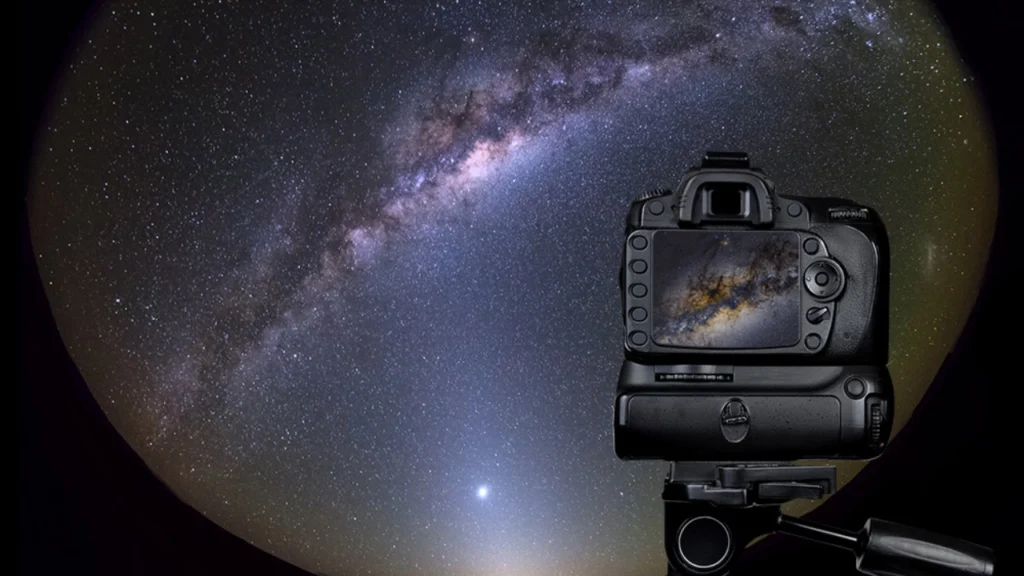
Step 8: Take Multiple Test Shots and Adjust Settings
Astrophotography is a lot of trial and error. Even after you’ve set up your DSLR, your first shot might not look perfect. Taking multiple test shots is key.
- Start with your guessed settings for aperture, shutter speed, and ISO.
- Take a test shot and review it. Are stars sharp? Foreground too dark? Too bright?
- Adjust one setting at a time so you know exactly what changes the image.
- Try bracketing: take the same frame with slightly different exposures. Later, you can pick the best or even stack them for extra detail.
Some nights, you’ll need to tweak a lot. That’s totally normal. Experimenting teaches you how your DSLR responds to dark skies, cold temperatures, and different lenses. The more you practice, the faster you’ll figure out how do I set up a DSLR to take photos of the stars like a pro.
Pro Tips for Better Star Photos
Once you’ve figured out how to set up a DSLR to take photos of the stars, there are a few extra tricks that can really level up your shots. Don’t worry, you don’t need a fancy setup—just a bit of patience and some small tweaks.
1. Reduce Light Pollution with Apps or Filters
Finding a dark spot is key. City lights can completely wash out the stars. Use apps like Light Pollution Map or Stellarium to scout locations nearby. If you’re stuck somewhere a little brighter, a light pollution filter can help cut down the glare. Even a small filter can make the Milky Way pop much better in your shots.
2. Keep Your Gear Warm and Batteries Full
Night photography can be brutal on gear. Cold nights drain batteries faster, so bring spares and keep them in your jacket pocket. Lens fog is another pain—so pack a microfiber cloth or even a hand warmer to keep your lens clear. Trust me, nothing ruins a night shoot faster than a foggy lens or dead camera.
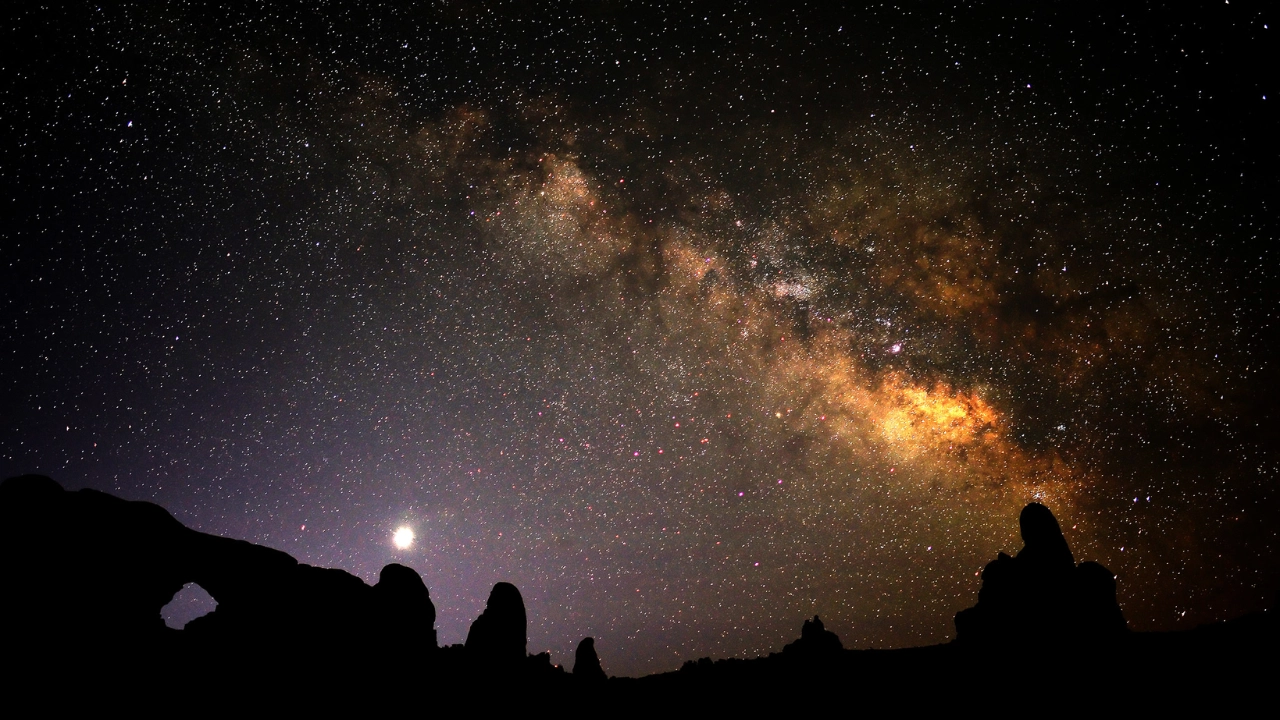
3. Experiment With Star Trails and Milky Way Shots
Once you’ve nailed basic star shots, try some fun variations. Star trails are awesome—just leave the shutter open longer or stack multiple exposures in post-processing. And if you’re lucky enough to be under a dark sky, framing the Milky Way is breathtaking. Play around with different compositions; a little foreground, like a tree or rock, makes it way more interesting than just empty sky.
4. Post-Processing Tips for Stunning Results
Shooting stars is only half the fun—the real magic often happens later. Shoot in RAW so you can pull out details in editing. Adjust contrast, exposure, and highlights to make stars pop, but don’t overdo it. A little noise reduction goes a long way, especially if you cranked your ISO high. There are tons of tutorials online, but the main goal is to make your stars shine without looking fake.
With these tips, your attempts at how to set up a DSLR to take photos of the stars will feel less like guesswork and more like real astrophotography. Remember, it’s okay if the first few shots aren’t perfect—night photography is all about experimenting, tweaking, and just enjoying the stars.
Also Check: 22 Best Eco-Conscious Travel Options Around The World
Common Mistakes to Avoid
When you’re just figuring out how do I set up a DSLR to take photos of the stars, it’s super easy to make little mistakes that ruin the shot. The good news? Most of these slip-ups are simple to fix once you know what to look out for. Here are three of the biggest ones.
1. Using Auto Focus or Auto Mode
If there’s one thing star photography hates, it’s auto settings. Your DSLR might be amazing for daytime shots, but when it comes to the night sky, autofocus just gets confused. The stars are way too tiny and far away for the camera to lock on properly, so you’ll end up with blurry photos.
The same goes for auto mode—it’s going to crank up the wrong settings like super long exposures or too low ISO. Instead, switch your DSLR into manual mode, open the aperture wide (f/2.8 is a sweet spot), and set the focus to infinity. Always check a test shot zoomed in to make sure your stars are actually sharp.
2. Long Shutter Speeds Without a Tripod
Ever seen those photos where the stars look like little streaks instead of dots? That’s usually because the shutter speed was too long and the camera wasn’t stable. Even the tiniest shake can mess up a star photo. Holding your DSLR by hand? Forget it—your heartbeat alone is enough to blur the picture.
Rule of thumb: use a tripod and follow the 500 Rule (500 divided by your lens focal length = max exposure time in seconds before stars trail). A solid tripod instantly makes your photos 100x better.
3. Forgetting to Turn Off Image Stabilization
This one sounds backwards, right? You’d think image stabilization would help. But nope. On a tripod, stabilization actually causes tiny movements inside the lens, which can create blur in your long exposure shots.
So, once you’ve got your DSLR mounted on a tripod, dive into the settings and switch stabilization off. Your stars will look much sharper, and you’ll save yourself from wondering why every picture still looks a little “off.”
Final Thoughts
So, after all the gear talk, settings, and trial-and-error nights under the sky, it really comes down to two simple things: patience and practice. If you’ve ever wondered how do I set up a DSLR to take photos of the stars, the truth is, it’s less about owning the fanciest equipment and more about giving yourself time to learn. Star photography is a mix of science and a little bit of magic—and honestly, that’s what makes it fun.
Here are a couple of takeaways before you pack up your tripod and head out:
- Don’t stress if your first shots look like blurry dots. Everyone starts there.
- Keep a checklist for your settings, so you don’t forget in the dark.
- Every night sky is different, so expect different results.
Now let’s break down two big things that can help you go from “random sky pics” to “wow, that’s actually the Milky Way.”
Why Patience Is Key in Astrophotography
- Stars don’t run on your schedule. You might have to wait for the right night, the right weather, and sometimes even the right season.
- Trial and error is part of the game. You’ll take 50 photos and maybe like 5 of them. That’s normal.
- Learning curve is real. Figuring out ISO, shutter speed, and focus in the dark takes time. And yeah, sometimes you’ll get it wrong.
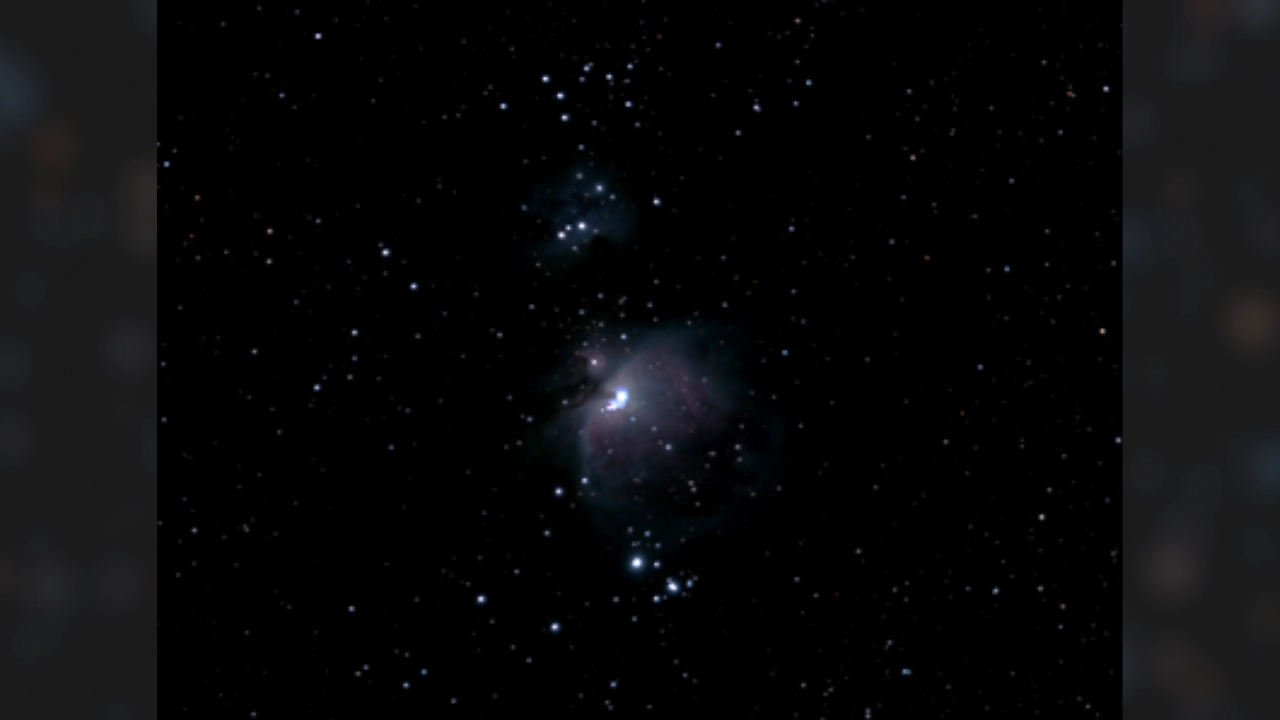
- But the reward is insane. That moment you finally capture a clear shot of Orion’s Belt or the Milky Way… totally worth the wait.
Start Simple, Then Experiment More
- Begin with the basics. Wide-angle lens, 20-second exposure, ISO around 1600. That’s enough to get started.
- Don’t overcomplicate it. You don’t need star trackers or $2000 lenses on day one. A tripod and patience go a long way.
- Once you’re comfy, try new stuff. Star trails, longer exposures, even light painting with a flashlight can spice things up.
- Editing is half the fun. Shooting in RAW lets you pull out details you didn’t even know were there.
- Keep challenging yourself. Move from “how do I set up a DSLR to take photos of the stars” to “how do I capture galaxies and nebulae.”
FAQ – DSLR Setup for Star Photography
What camera settings should I use to photograph stars with a DSLR?
Start simple: manual mode, wide aperture (f/2.8 or lower if possible), ISO between 1600–3200, and shutter speed around 15–25 seconds. Adjust depending on how bright the sky is.
Do I need an expensive lens to take star photos?
Nope, A wide-angle lens with a fast aperture works best, but even a basic kit lens can give you good results when paired with the right settings and a sturdy tripod.
How do I focus my DSLR on stars at night?
Turn off autofocus and switch to manual focus. Point at a bright star or a distant light, then slowly adjust the focus ring until it looks sharp. Using live view zoom on your LCD really helps.
Can I take pictures of stars in a city with light pollution?
You can, but it’s tricky. Light pollution drowns out most stars. If possible, drive to a dark-sky area. If not, try shooting the brightest stars or even the moon and planets.
What is the 500 rule in astrophotography?
The 500 rule helps avoid star trails. Just divide 500 by the focal length of your lens (e.g., 500 ÷ 20mm = 25). That’s the max shutter speed you should use before stars start streaking.